Poly Network — In-Depth Analysis of the Biggest Heist in DeFi History

Originally published in Valix Consulting’s Medium.
This report provides an in-depth analysis of the Poly Network’s heist incident on August 10, 2021. The heist affected the user assets worth more than $610M, breaking the record to become the biggest heist in DeFi history.
In this report, we provide a comprehensive analysis and give our recommended remediation in the end.
Table of Contents
TLDR
The Poly Network’s cross-chain bridge has been exploited on August 10, 2021. The incident affected user assets on Ethereum, Binance Smart Chain (BSC), and Polygon chains, worth more than $610M.
The incident’s root cause is that the Poly Network’s smart contracts lacked proper input validations and sanitizations, allowing an attacker to craft attack transactions inappropriately.
After the incident, the attacker took a white hat hacker role and returned all affected assets to the Poly Network team.
How Does the Poly Network’s Bridge Work?
Poly Network is a cross-chain bridge service provider for ERC20 tokens, operating on several chains such as Ethereum, Binance Smart Chain (BSC), Polygon, Heco, Ontology, etc.
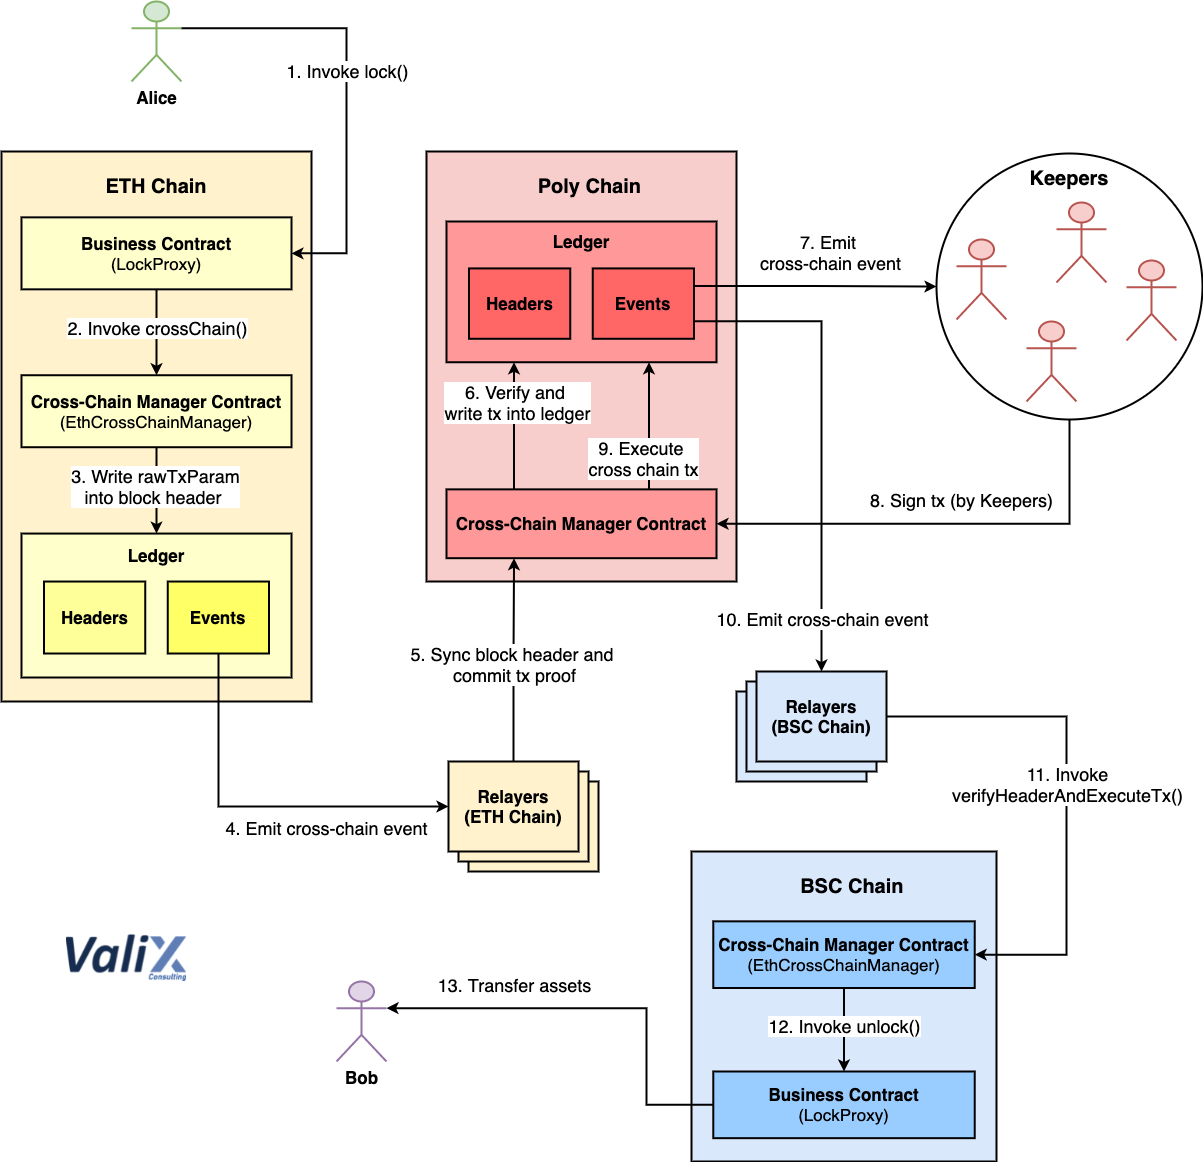
Figure 1. Cross-chain bridge between ETH and BSC chains
Figure 1 explains how Poly Network’s bridge works in detail. For example, Alice on the Ethereum chain (source chain) wants to bridge her ERC20 token to Bob on the BSC chain (destination chain).
Conceptually, Alice has to transfer her token and lock it in the Poly Network’s service contract on the source chain. The service contract then triggers the Poly Network’s off-chain relayer to submit the cross-chain transaction request to the relay chain Poly.
There will be a set of consensus book keepers in the Poly Network. They perform the multi-signature signs on every cross-chain transaction before submitting the signed transaction to execute on the destination chain.
On the destination chain, the service contract would verify the transaction using the Merkle proof algorithm. The service contract also verifies the signatures endorsed by the keepers. The designated token will be unlocked and transferred to Bob’s target address if the transaction verification is succeeded.
In addition to the consensus book keepers, the Poly Network’s consensus mechanism will periodically change the keepers. Therefore, only the selected keepers in the current epoch can sign and make the transaction effective on the destination chain.
To deeper understand the bridging mechanism, follows the step-by-step below.
-
On the Ethereum chain, Alice invokes the
lockfunction on the business contractLockProxyto lock her ERC20 token inside the contract. -
The
LockProxycontract invokes thecrossChainfunction on the cross-chain manager contractEthCrossChainManager. -
The
EthCrossChainManagercontract generates the raw parametersrawTxParamfor the cross-chain transaction. The contract then writes therawTxParamand its metadata as the cross-chain block header into the Ethereum chain’s ledger. -
The
EthCrossChainManagercontract emits a cross-chain event to trigger the off-chain relayers. -
One of the Ethereum-chain relayers verifies the
rawTxParaminside the block header using the Merkle Proof algorithm and then sync the block header and transaction proof to the cross-chain manager contract on the Poly chain (Relay chain). -
The Poly chain’s cross-chain manager contract verifies the
rawTxParamagain and commits the transaction request into the ledger. -
The cross-chain manager contract emits an event to notify the keepers about the request to sign the new transaction.
-
The keepers use the multi-signature tool to sign the transaction and submit their signatures to the manager contract.
-
The cross-chain manager contract confirms the signatures and commits the cross-chain transaction into the Poly chain’s ledger.
-
The cross-chain manager contract emits an event to activate the BSC chain’s relayers.
-
One of the BSC-chain relayers verifies the
rawTxParaminside the block header again and invokes theverifyHeaderAndExecuteTxfunction on the cross-chain manager contractEthCrossChainManageron the BSC chain. -
The
EthCrossChainManagercontract on the BSC chain invokes theunlockfunction on the business contractLockProxyto unlock the token. -
On the BSC chain, the
LockProxycontract transfers the designated token to Bob.
In-Depth Heist Analysis
In this section, we explain the heist incident in detail. The incident affected user assets worth more than $610M on Ethereum, BSC, and Polygon chains.
We analyze the incident based on the attack transactions on the BSC chain. The incident composed of two steps including:
-
Replacing consensus book keeper set (TX hash: 0x3eba3f…8d3be9)
-
Unlocking and draining the assets (TX hash: 0xd59223…7de11a)
Step 1: Replacing Consensus Book Keeper Set
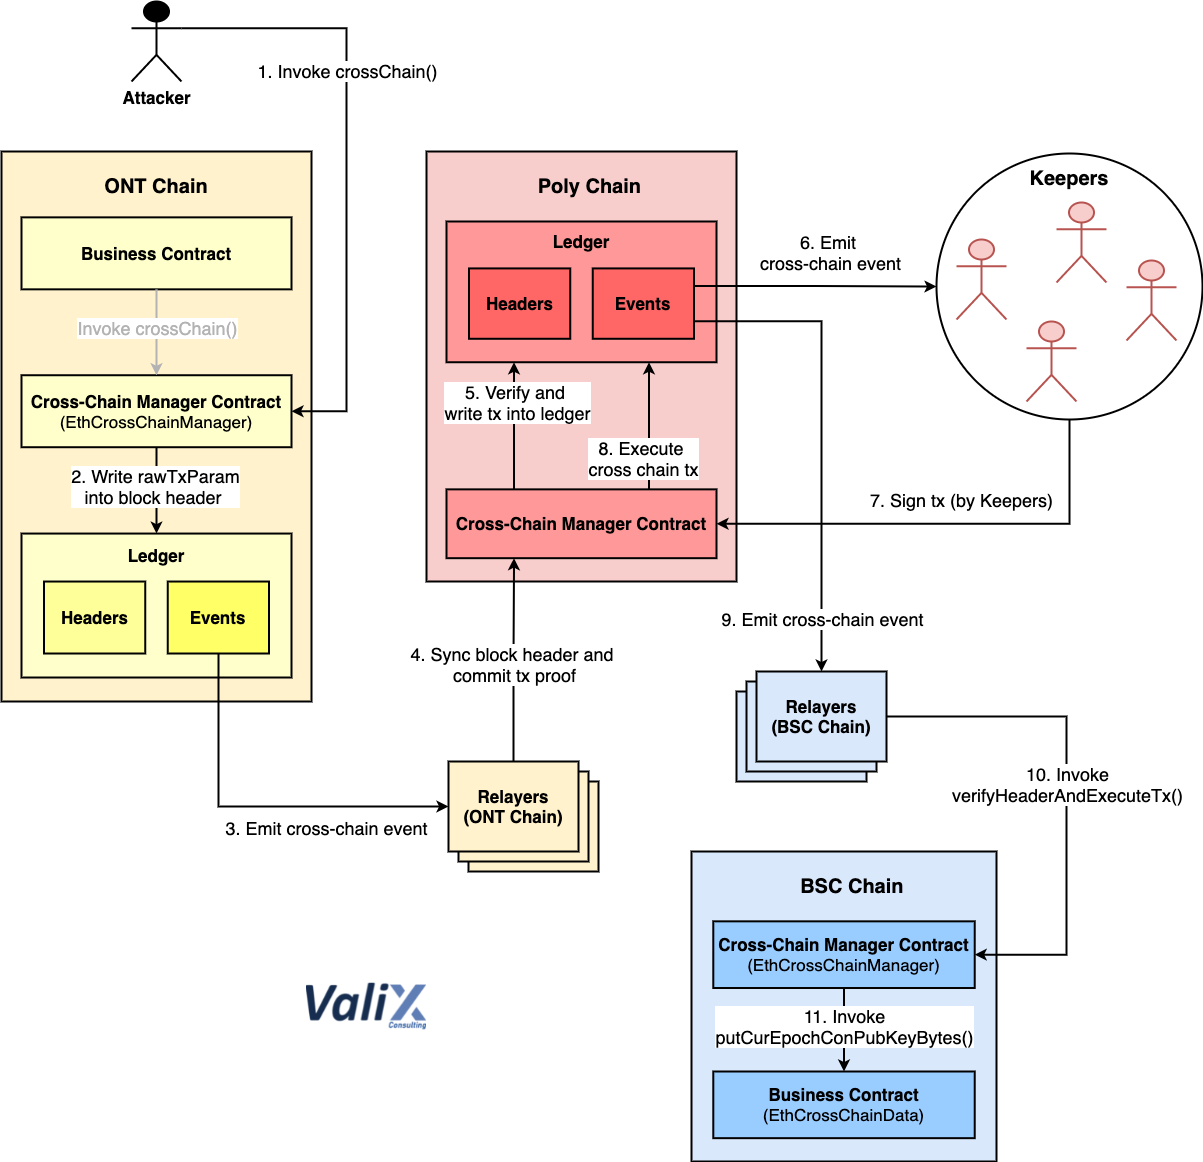
Figure 2. The attacker replaces the Poly Network’s consensus book keeper set
The attacker began the attack by submitting the cross-chain transaction from the Ontology chain (Step 1) to replace the Poly Network’s consensus book keeper set on the BSC chain (Step 11), as described in Figure 2.
Typically, a user will interact with the business contract. The business contract then invokes the crossChain function on the cross-chain manager contract EthCrossChainManager to trigger a cross-chain transaction to execute a specific function of a target contract on the destination chain.
However, the attacker bypassed the mentioned step above by calling the crossChain function directly (Step 1). The bypass was possible because the crossChain function allowed any smart contract or user to execute freely, as shown in Figure 3 below.
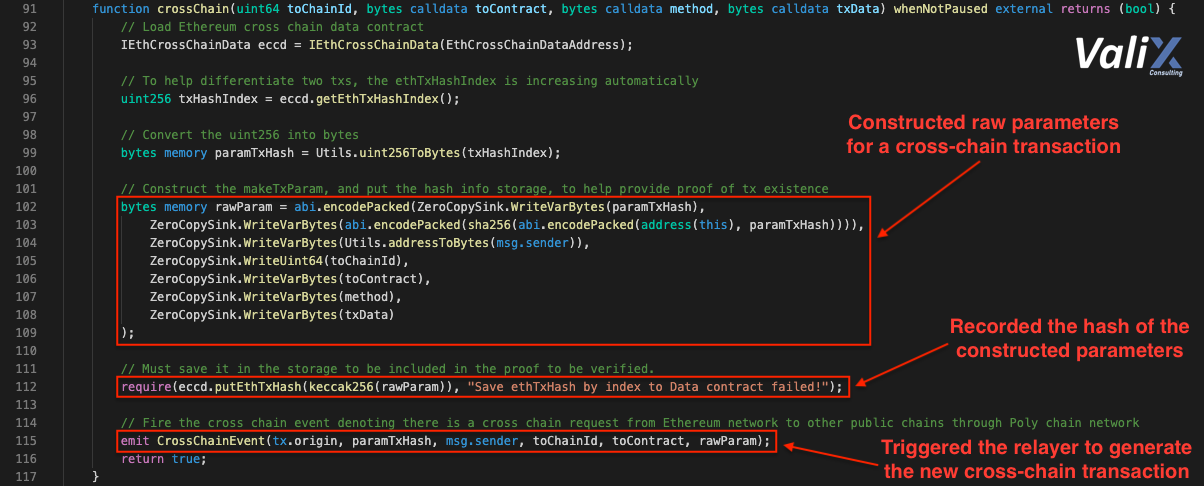
Figure 3. The crossChain function on the EthCrossChainManager contract
The crossChain function constructed the raw parameters rawParam based on the attacker’s input parameters: toChainId, toContract, method, and txData (line no’s. 102–109).
The function then recorded the hash of the rawParam as the transaction request proof (line no. 112). Next, the function emitted the cross-chain event embedding the rawParam into (line no. 115) to trigger the off-chain relayer (Step 3 in Figure 2) to generate the cross-chain transaction.
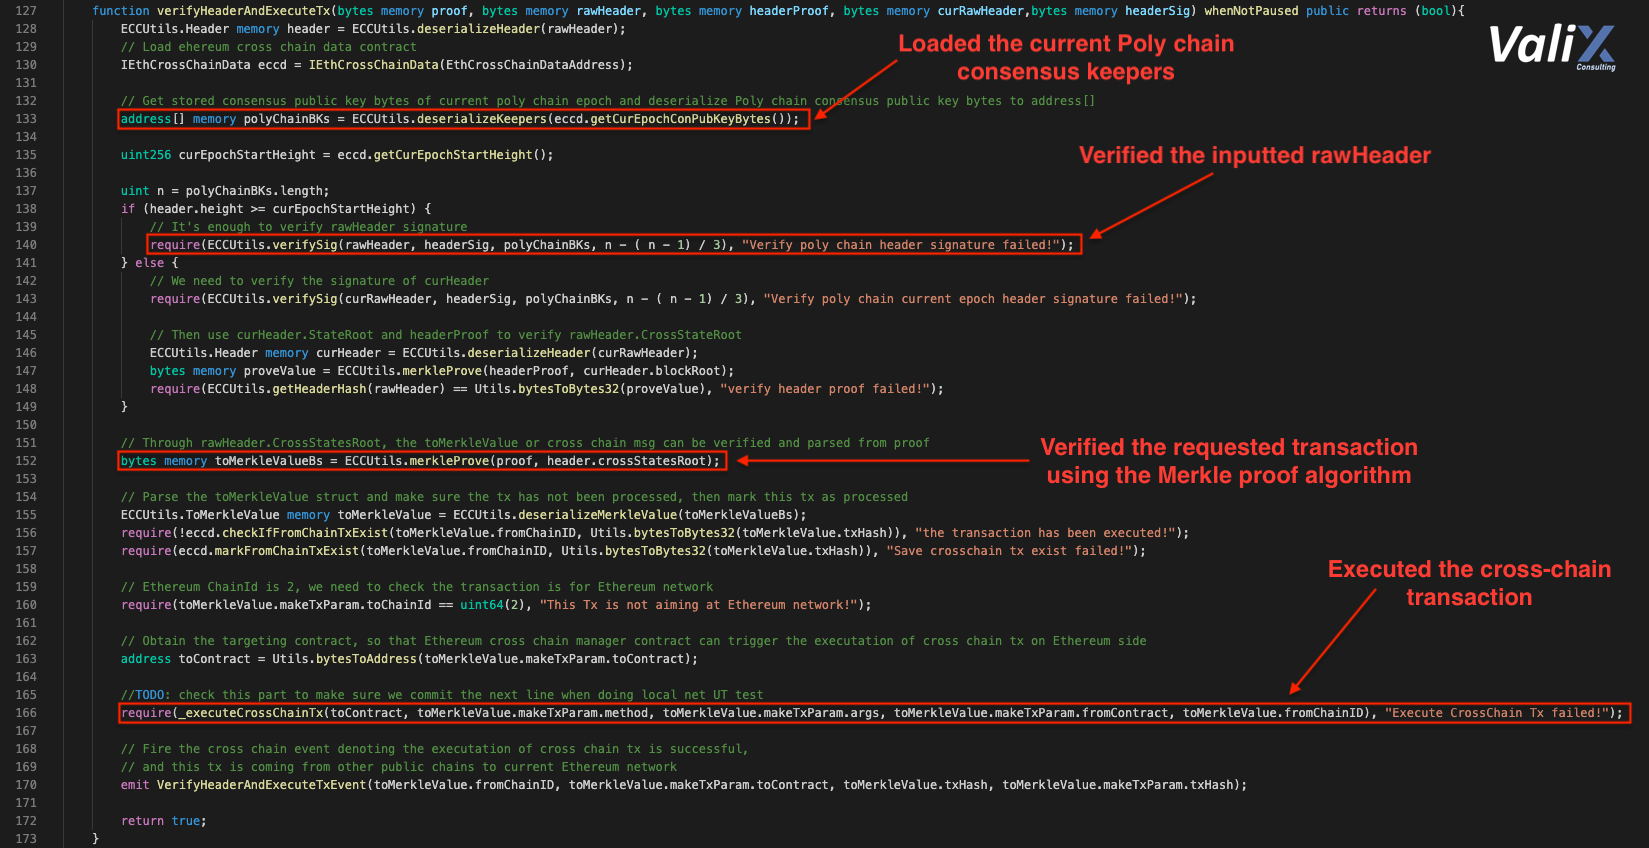
Figure 4. The verifyHeaderAndExecuteTx function on the EthCrossChainManager contract
Figure 4 shows the verifyHeaderAndExecuteTx function of the EthCrossChainManager contract on the BSC (destination chain). This function was invoked by the Poly Network’s relayer (Step 10 in Figure 2) to execute the attack transaction originated from the Ontology (source chain).
The verifyHeaderAndExecuteTx function would verify the cross-chain transaction before executing it. Firstly, the function verified the signatures endorsed by the current keepers.
Specifically, the function loaded the current keepers from another service contract named EthCrossChainData (line no. 133). Next, the function verified the inputted rawHeader containing the requested transaction (line no. 140). The rawHeader would be valid if and only if there must collect valid signatures more than or equal to the result from the equation: n — (n — 1) / 3, where n is the number of current keepers.
Secondly, the function verified the requested transaction using the Merkle proof algorithm (line no. 152). Once the transaction passed the proof, the verifyHeaderAndExecuteTx function executed the specific function on the target contract according to the parameters in the rawHeader (line no. 166).

Figure 5. The ConKeepersPkBytes variable before the replacement
Figure 5 shows the consensus book keeper set (the state variable ConKeepersPkBytes on the EthCrossChainData contract) before the attack.
There were 4 keepers’ public keys:
-
Keeper #1: 0x3dfccb7b8a6972cde3b695d3c0c032514b0f3825
-
Keeper #2: 0x4c46e1f946362547546677bfa719598385ce56f2
-
Keeper #3: 0xf81f676832f6dfec4a5d0671bd27156425fcef98
-
Keeper #4: 0x51b7529137d34002c4ebd81a2244f0ee7e95b2c0
As per the equation n — (n — 1) / 3, the valid transaction must be endorsed by at least 3 above keepers. Since the attacker invoked the attack transaction like a typical cross-chain transaction, the keepers adequately approved the transaction to be valid like other transactions.
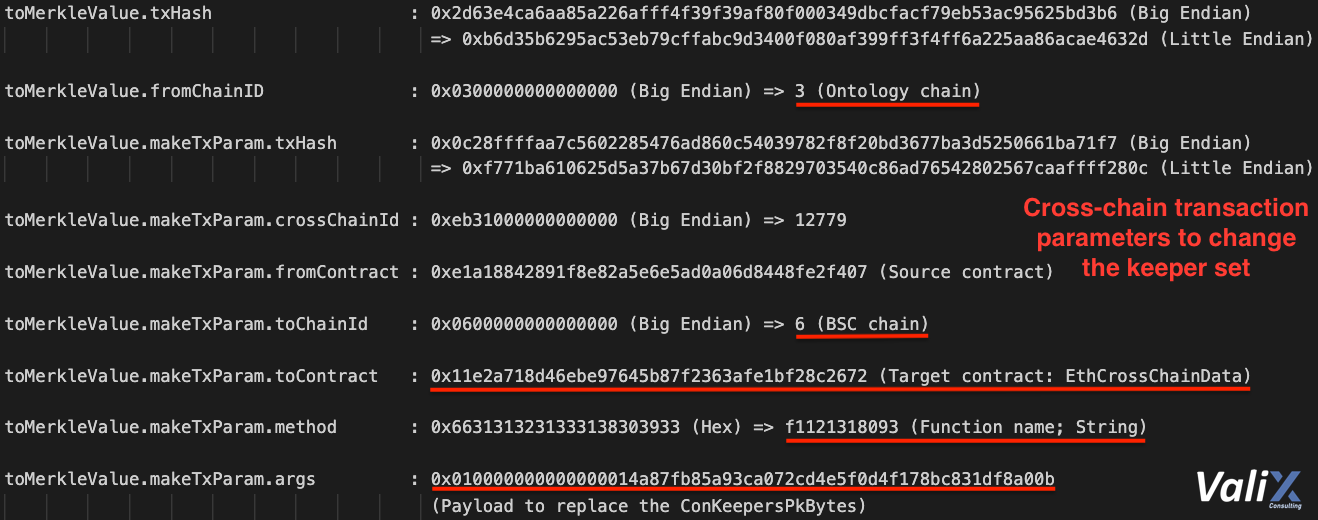
Figure 6. The cross-chain transaction parameters for replacing the keeper set
The decoded cross-chain transaction parameters are shown in Figure 6. As you can see, the transaction was initiated on the Ontology chain to execute the target function named f1121318093 on the service contract EthCrossChainData on the BSC chain.
We found that the function f1121318093 did not exist on the EthCrossChainData contract, though. At that point, we realized that we had found a clue on this amazing function name.
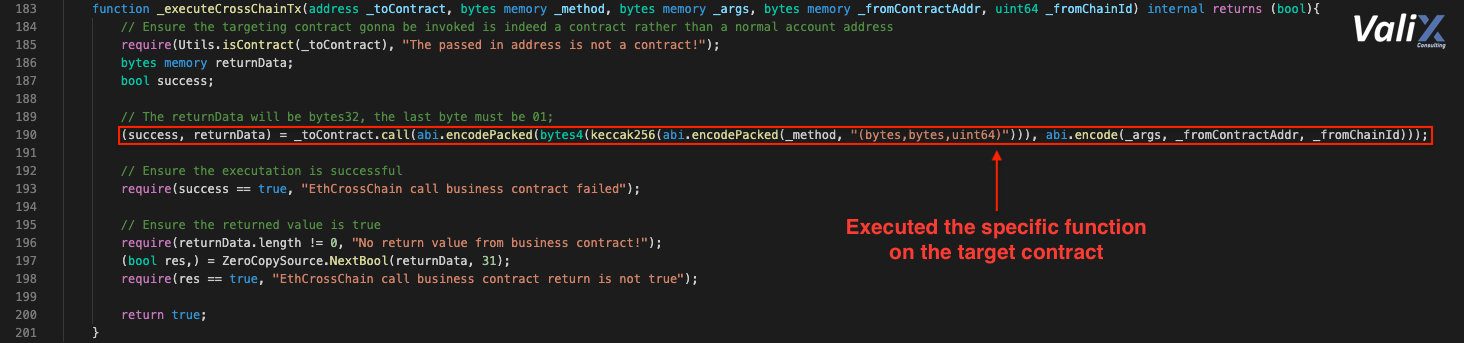
Figure 7. The _executeCrossChainTx function on the EthCrossChainManager contract
The _executeCrossChainTx function is shown in Figure 7. This function was called by the verifyHeaderAndExecuteTx function after the cross-chain transaction verification was succeeded.
The _executeCrossChainTx function would invoke the specific function on the target contract according to the inputted parameters _method and _toContract, respectively (line no. 190).
Interestingly, the _executeCrossChainTx function computed the signature hash of the function to invoke using the following pattern:
|
|
Specifically, the inputted parameter _method would be concatenated with the latter string “(bytes,bytes,uint64)”. The concatenated string would then be hashed using the Keccak256 algorithm. After that, the first four bytes of the hash would become the signature hash of the function to invoke.
We then tried to generate the function signature hash using the function name f1121318093.The resulting hash was 0x41973cd9. Next, we tried to match the resulting hash with every function on the EthCrossChainData contract.
Eventually, we found that the putCurEpochConPubKeyBytes function (as shown in Figure 8 below) has the same signature hash as the function f1121318093 specified by the attacker.

Figure 8. The putCurEpochConPubKeyBytes function on the EthCrossChainData contract
Now, we knew that the attacker tried to change the consensus book keepers (i.e., the state variable ConKeepersPkBytes).
It might be tricky since the putCurEpochConPubKeyBytes and the f1121318093 functions have different input parameters. However, the EVM (Ethereum Virtual Machine) locates the target function using the 4-byte hash.
Hence, the attacker had to perform the hash collision attack to find the random string that generates the hash result that collides with the hash of the target function signature putCurEpochConPubKeyBytes(bytes).

Figure 9. Different function signatures that generate the same function signature hash
Figure 9 shows how easy to generate the collided hash results. Since only the first four bytes of the entire Keccak256 hash would be used, the possibility of finding the fitting random string is quite huge.
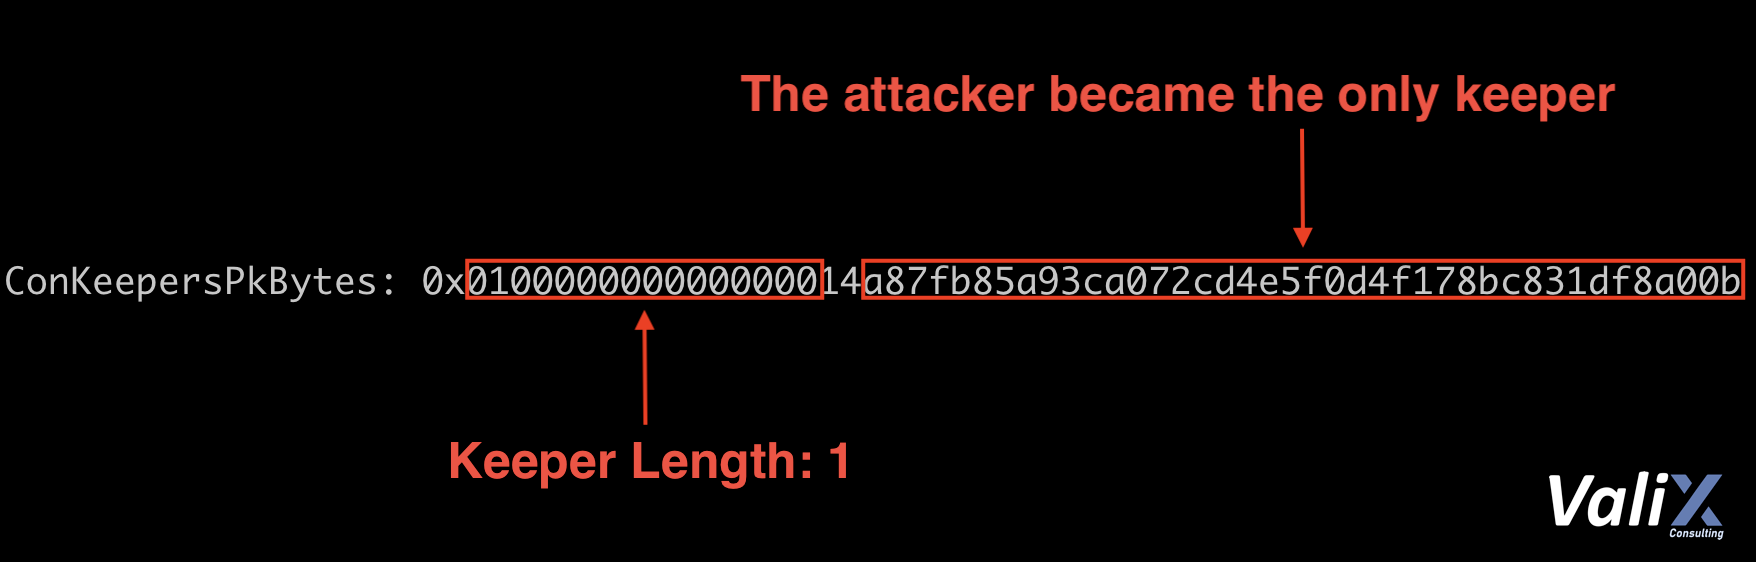
Figure 10. The ConKeepersPkBytes variable after the replacement
After successfully invoking the putCurEpochConPubKeyBytes function, the consensus book keeper set (the ConKeepersPkBytes in Figure 10) was replaced with the attacker’s public key:
- 0xa87fb85a93ca072cd4e5f0d4f178bc831df8a00b
Consequently, the Poly Network was taken over by the attacker because the attacker became the sole keeper. In other words, only the attacker would be able to execute the transaction on the destination chain by using his corresponding private key to endorse the transaction.
Whereas any cross-chain transaction submitted by other users through the Poly chain would be reverted on the destination chain because the signatures endorsed by the (valid) keepers would become invalid.

Figure 11. The owner of the EthCrossChainData contract was the EthCrossChainManager
Let’s consider Figure 11. One of the root cause that made this attack transaction invocation succeeded is because the owner of the EthCrossChainData contract was the EthCrossChainManager.
The objective of this attack step was to take over and bypass the cross-chain transaction invocation mechanism to facilitate and speed up the next attack step.
Step 2: Unlocking and draining the assets
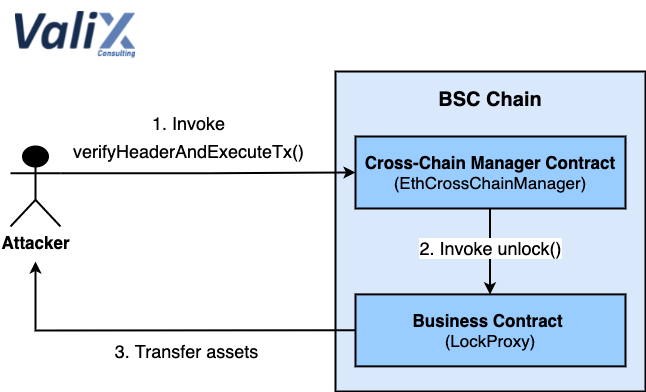
Figure 12. The attacker takes the profit
The next attack step was unlocking and draining the assets to take the profit, as sketched in Figure 12. The attacker crafted a transaction and signed it with his corresponding private key (acting as the keeper). Later, the attacker submitted the transaction to invoke the verifyHeaderAndExecuteTx function on the BSC chain (Step 1).
At this point, the crafted transaction parameters commanded the function to execute the unlock function on the business contract LockProxy (Step 2) to unlock a target ERC20 token. Finally, the LockProxy contract transferred the target token to the attacker (Step 3).
Interestingly, the attacker could perform this attack step on the destination chain immediately because he had manipulated himself as the only book keeper. Thus, the attacker could create and sign the transaction himself without the need to interact with other external entities.
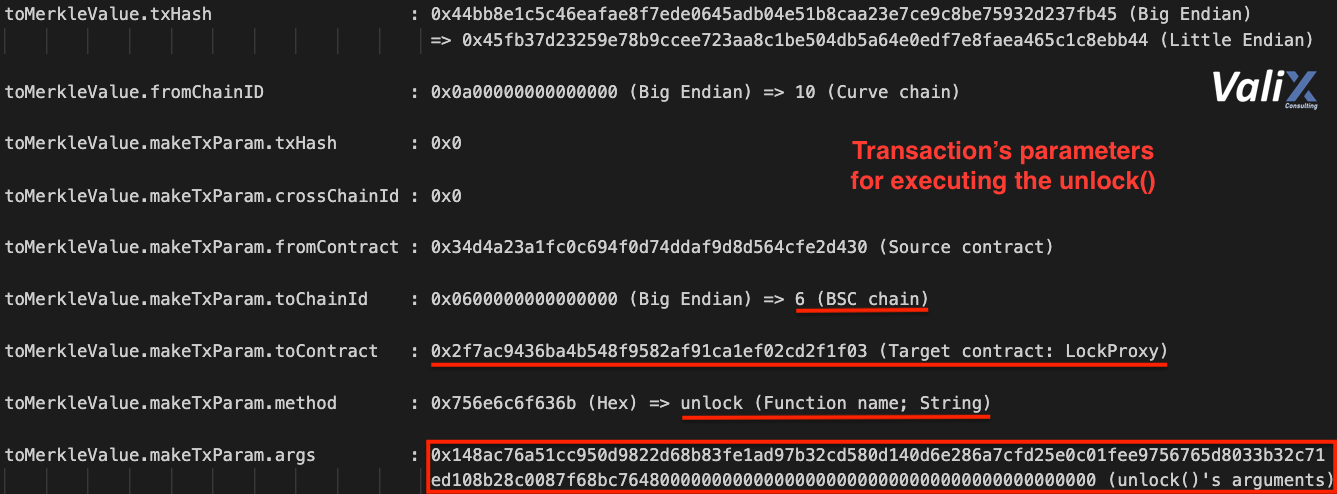
Figure 13. The transaction parameters for taking the profit
The crafted transaction parameters for the attacker to take the profit are shown in Figure 13. As you can see, the target function is unlock on the LockProxy contract.
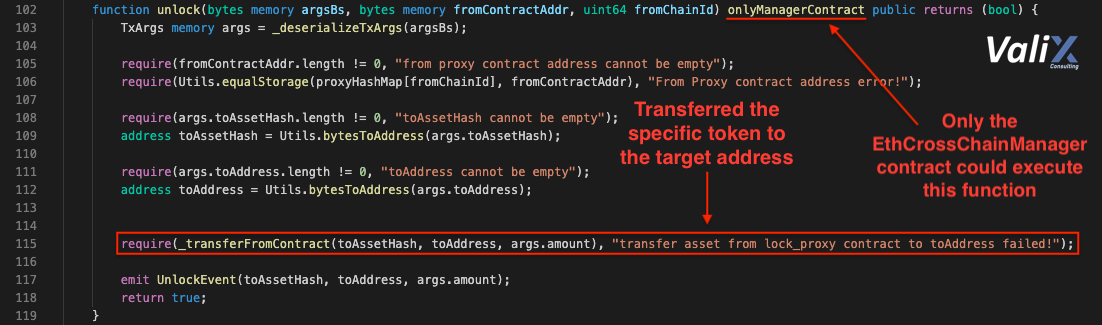
Figure 14. The unlock function on the LockProxy contract
Figure 14 shows the unlock function on the LockProxy contract. This function transferred the specific token to the attacker’s address (line no. 115) according to the crafted input parameter argsBs.
It is also interesting to note that this function was executable by the
EthCrossChainManagercontract only.
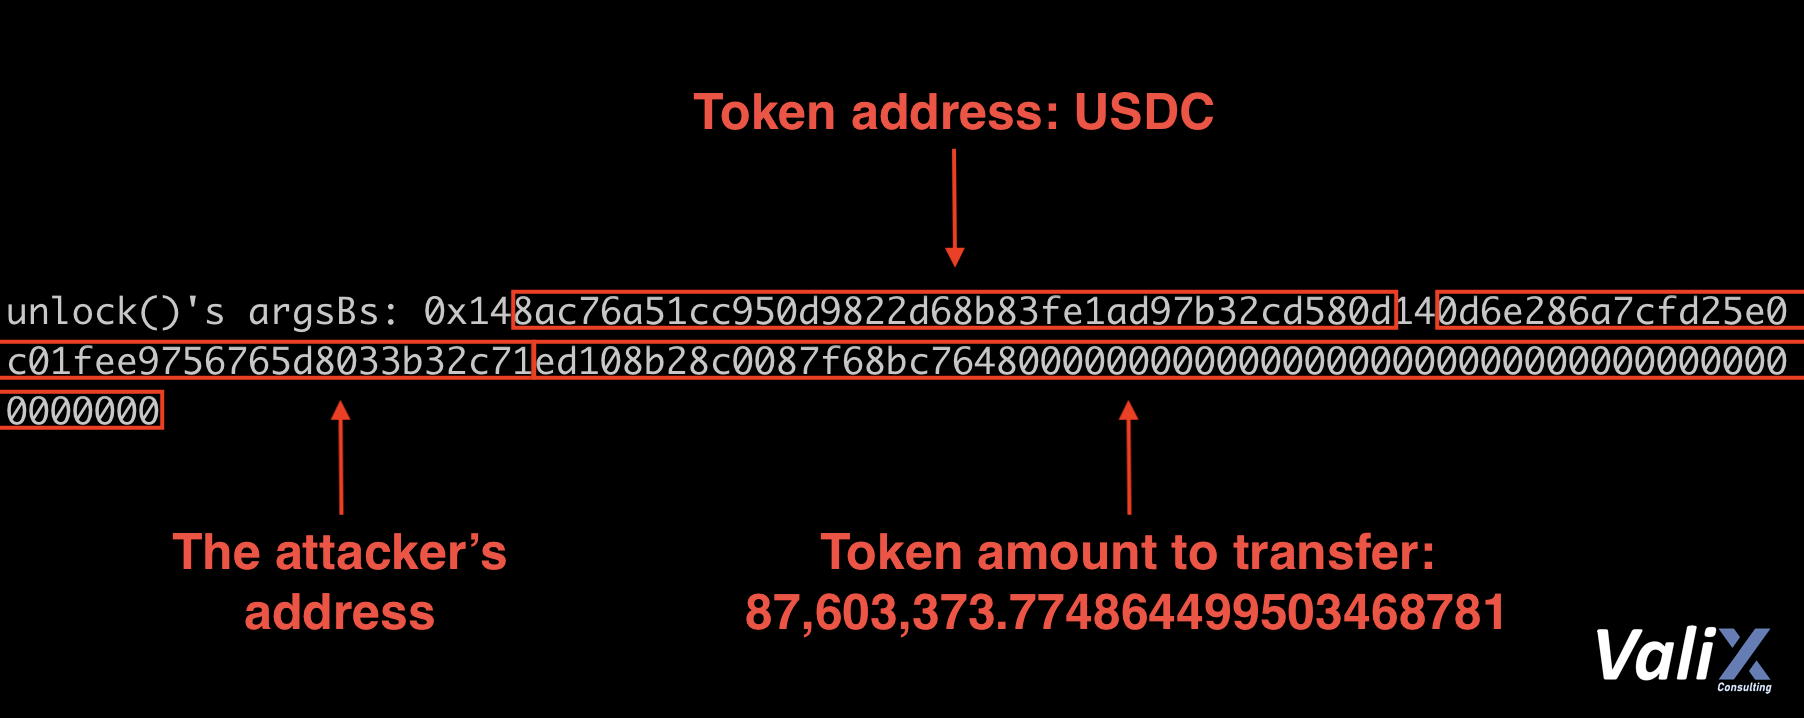
Figure 15. The parameter argsBs of the upload function
The input parameter argsBs of the unlock function is shown in Figure 15. The following are the extracted parameters:
-
Token address: 0x8ac76a51cc950d9822d68b83fe1ad97b32cd580d (USDC)
-
Target address: 0x0d6e286a7cfd25e0c01fee9756765d8033b32c71 (The attacker’s address)
-
Token amount: 87,603,373.774864499503468781 USDC
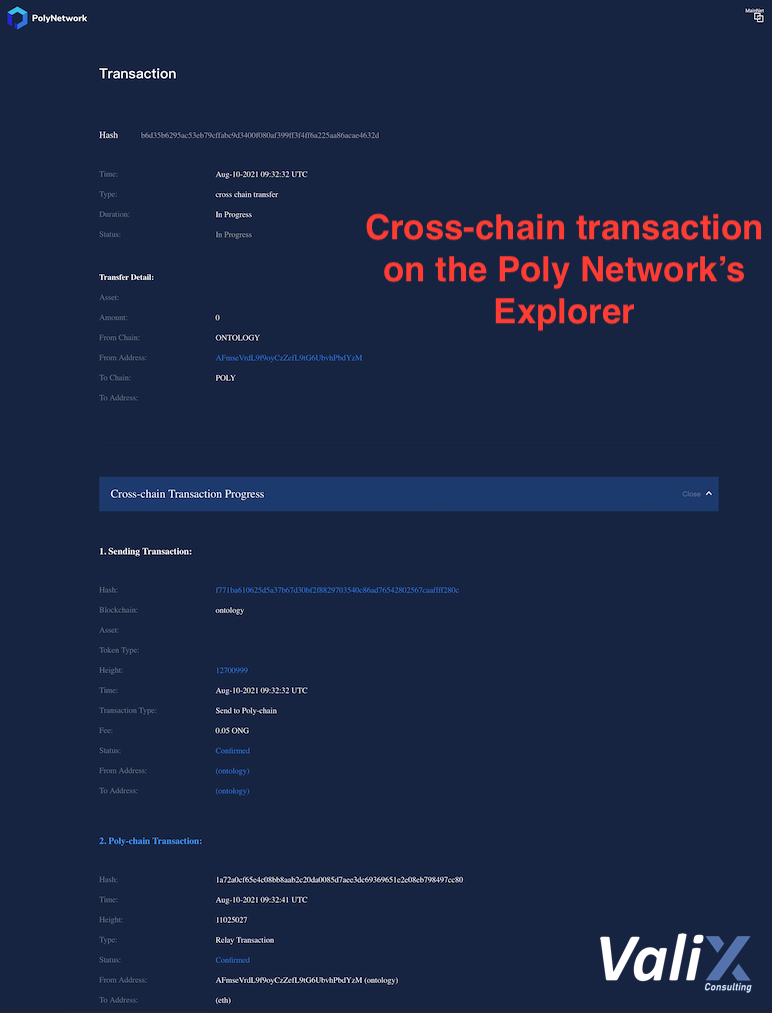
Figure 16. The cross-chain transaction on the Poly Network’s Explorer
The attack transaction (the attack step #1) to replace the consensus book keeper set on the Poly Network’s Explorer is shown in Figure 16. Inspect the transaction evidence here.
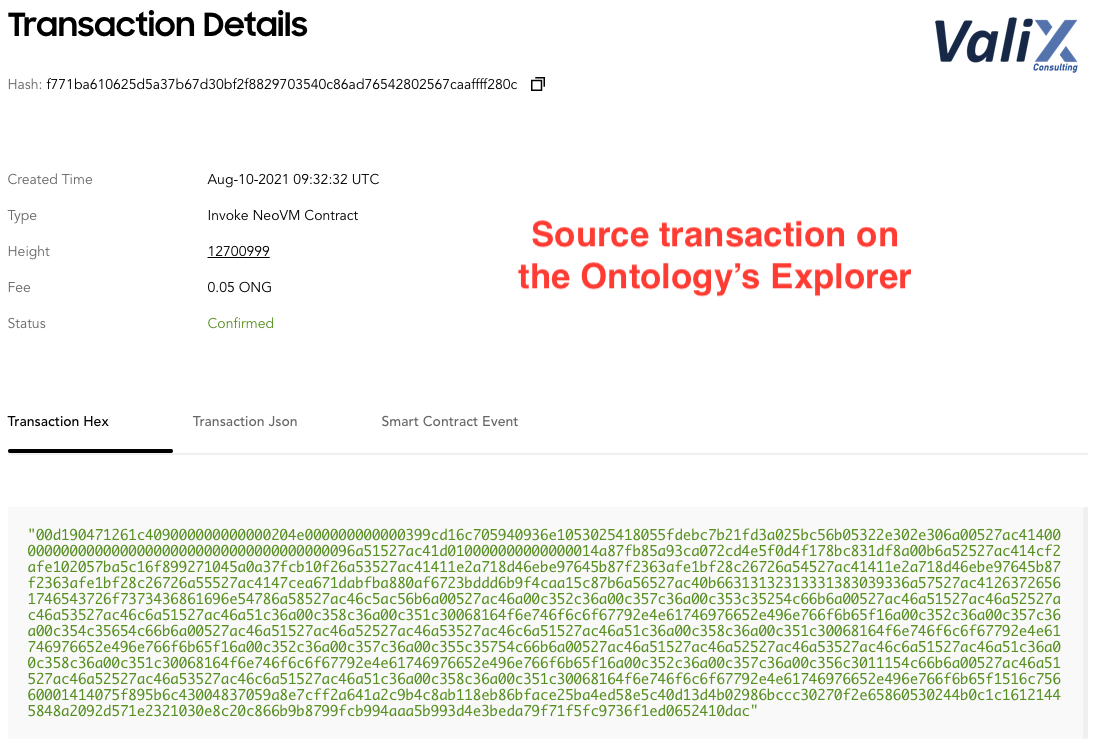
Figure 17. The source transaction on the Ontology’s Explorer
In addition, Figure 17 shows the source of the cross-chain transaction (the attack step #1) on the Ontology chain. Examine the transaction evidence here.
In fact, the attacker performed the attack step #2 repeatedly to unlock and drain tokens.
Furthermore, the attacker executed the same operation on Ethereum, BSC, and Polygon chains.
Asset Recovery
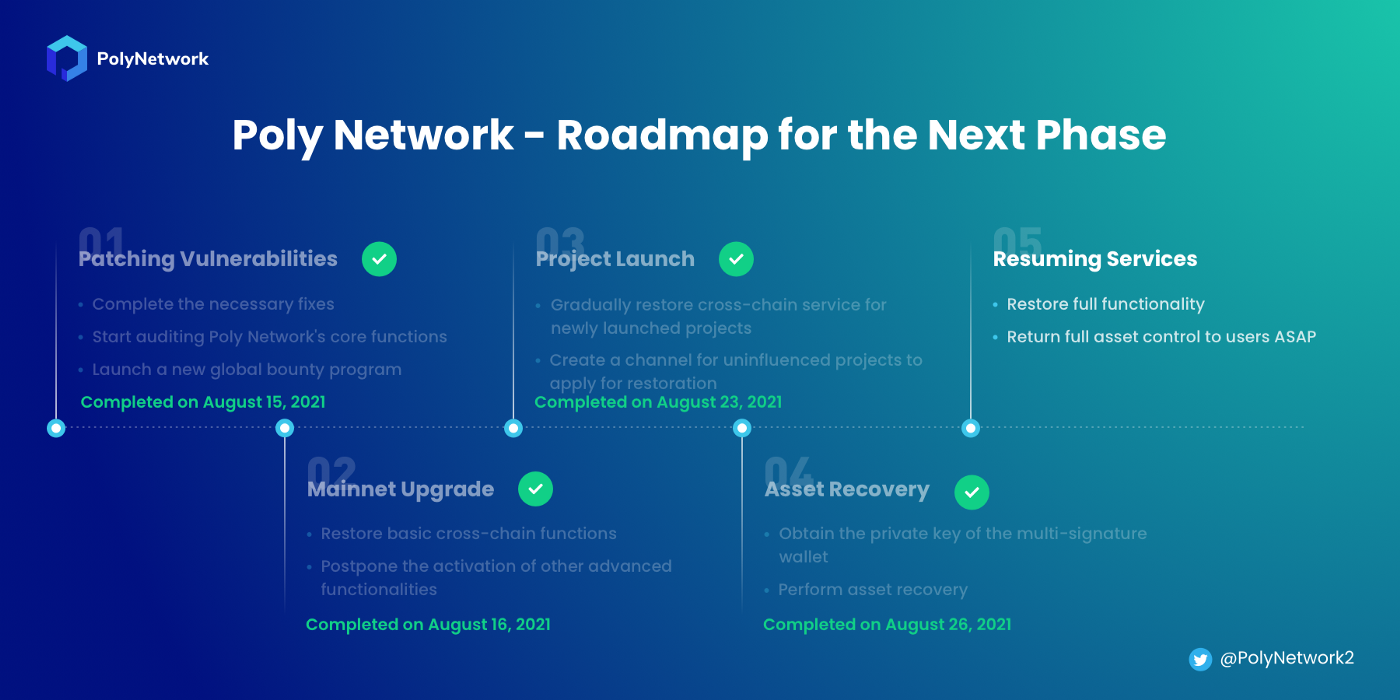
Figure 18. Poly Network’s restoration roadmap (Image courtesy of the Poly Network)
After the heist incident, the attacker announced to return all assets to the Poly Network team.
Now, the team has confirmed that the recovery process of the affected assets has been completed. And, the team is gradually resuming its services, as illustrated in the roadmap in Figure 18.
Recommended Remediation
This heist incident happened due to the lack of proper input validations and sanitizations on both the crossChain and verifyHeaderAndExecuteTx functions of the EthCrossChainManager contract.
We recommend the Poly Network team implement the whitelist and enforce the proper input validations and sanitizations on both the crossChain and verifyHeaderAndExecuteTx functions using the whitelist.
The whitelist ensures that only the permitted functions and smart contracts will be able to execute.
Summary
We provide a comprehensive analysis on the biggest heist in DeFi history affected the Poly Network, one of the most extensive cross-chain bridging protocol. Furthermore, we found the root cause of the incident and give the recommended remediation in this report.
Author Details
Phuwanai Thummavet (serial-coder), Lead Blockchain Security Auditor and Consultant | Blockchain Architect and Developer.
See the author’s profile.
About Valix Consulting
Valix Consulting is a blockchain and smart contract security firm offering a wide range of cybersecurity consulting services. Our specialists, combined with technical expertise with industry knowledge and support staff, strive to deliver consistently superior quality services.
For any business inquiries, please get in touch with us via Twitter, Facebook, or info@valix.io.
Originally published in Valix Consulting’s Medium.